1. 목차
개인적으론 snapKit이 직관적이고 쉬운 것 같은데, 생각보다 FlexLayout + PinLayout도 많이 사용하는 것 같더라고요. 이제 거의 다 왔습니다. 빠르게 마무리 지어보고 사용하다가 팁이나 문제가 생기면 바로 새로운 글을 올려보겠습니다.
PinLayout의 사용 시점은 레이아웃이 다 잡히는 시점(슈퍼뷰의 위치 및 크기를 알 수 있는 시점)인 viewDidLayoutSubViews(), layoutSubViews()에서 사용해줘야 합니다. 그 이유는 장치 회전 및 컨테이너 크기를 동적으로 조절하기 위해서 위와 같은 시점에서 사용됩니다.
한 번, 자주 사용할 것 같은 메서드들만 알아봅시다.
2. Edges Layout
PinLayout은 AutoLayout이나 SnapKit과 비슷하게 슈퍼뷰를 기준으로 4개의 모서리를 잡아주면, 레이아웃을 완성할 수 있습니다.
- all
가장 많이 사용할 것 같은 메서드죠. 모든 모서리의 레이아웃을 한 번에 잡아 주는 방식입니다.
<swift>viewA.pin.all()
- top, bottom, left, right
위에서 설명은 안 했는데, 살펴보면 기본적으로 모서리를 잡아주는 메서드들은 오버로드가 돼 있는데요. 상황에 맞게 원하는 offset을 나타내 줄 수 있습니다.
- ()
- (_ offset: CGFloat) - 절댓값
- (_ offset: Percent) - 비율
- (_ margin: UIEdgeInsets) - 모서리
간단히 사용해 봅시다.
      <swift>


      override func viewDidLayoutSubviews() {
    super.viewDidLayoutSubviews()

    // 기본 슈퍼뷰 값
    viewA.pin
        .top()
        .bottom()
        .left()
        .right()

    // 절대값으로 offset 주기
    viewA.pin
        .top(50)
        .bottom(50)
        .left(50)
        .right(50)

    // 퍼센트로 offset 주기
    viewA.pin
        .top(20%)
        .bottom(20%)
        .left(20%)
        .right(20%)

    // UIEdgeInsets으로 offset 주기
      viewA.pin
        .top(view.pin.safeArea)
        .bottom(view.pin.safeArea)
        .left()
        .right()
}

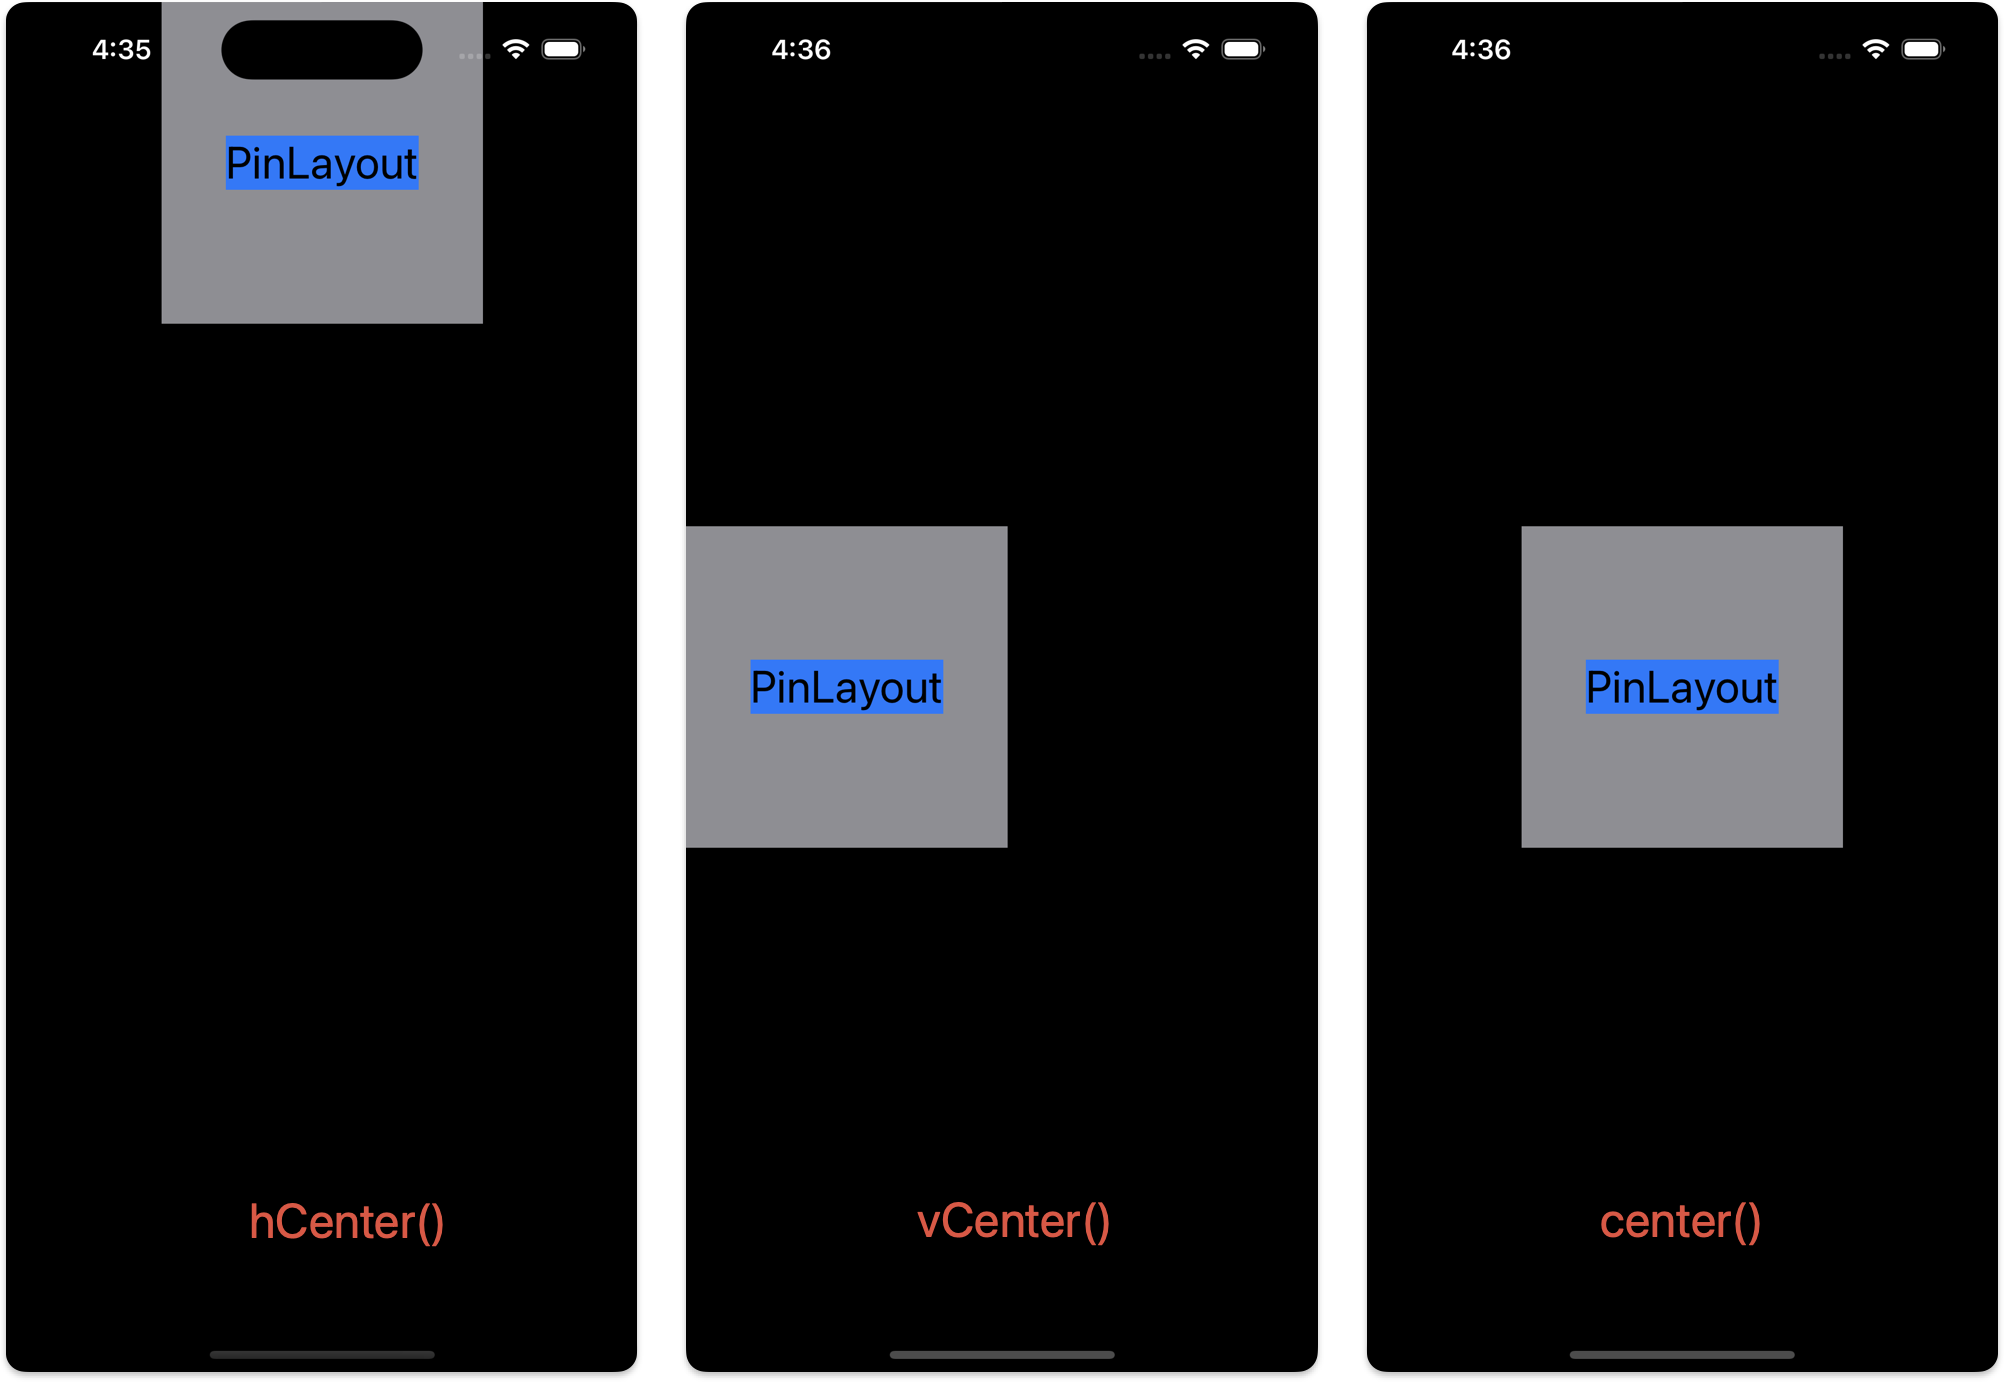
- vCenter, hCenter
중심축을 기준으로 사용도 가능합니다.
- ()
- (_ offset: CGFloat) - 절댓값
- (_ offset: Percent) - 비율
제 생각엔 절댓값과 비율을 만지는 건 헷갈릴 수 있으므로, 잘 사용하지 않을 것 같아 보이네요.
      <swift>


      override func viewDidLayoutSubviews() {
    super.viewDidLayoutSubviews()

    // 수직선 기준
    viewA.pin
        .vCenter()
        .size(200)

     // 수평선 기준
    viewA.pin
        .hCenter()
        .size(200)

    // 중심
    viewA.pin
        .vCenter().hCenter()  // == center()
        .size(200)

}

그리고 또, 아래와 같이 조합해서 사용할 수 있습니다.
      <swift>


         viewA.pin.top(20).bottom(20)   // The view has a top margin and a bottom margin of 20 pixels
   viewA.pin.top().left()         // The view is pinned directly on its parent top and left edge
   viewA.pin.all()                // The view fill completely its parent (horizontally and vertically)
   viewA.pin.all(pin.safeArea)    // The view fill completely its parent safeArea
   viewA.pin.top(25%).hCenter()   // The view is centered horizontally with a top margin of 25%
   viewA.pin.left(12).vCenter()   // The view is centered vertically
   viewA.pin.start(20).end(20)    // Support right-to-left languages.
   viewA.pin.horizontally(20)     // The view is filling its parent width with a left and right margin.
   viewA.pin.top().horizontally() // The view is pinned at the top edge of its parent and fill it horizontally.
여러 모서리를 고정하는 방법

이런 식으로 메서드들의 이름이 직관적이라 다른 설명들은 생각하겠습니다.
      <swift>


      viewA.pin.topRight().size(100) == viewA.pin.top().right().size(100)
3. 상대 위치 지정을 사용한 레이아웃
여러 뷰가 존재하고, 다른 뷰의 위치를 기준으로 레이아웃을 잡아줄 수 있습니다.
여러 메서드가 있는데, 간단히 알아봅시다.
- above(of: UIView) / above(of: [UIView]) - 위에 배치
- below(of: UIView) / below(of: [UIView]) - 아래 배치
- before(of: UIView) / before(of: [UIView]) - 왼쪽 배치
- after(of: UIView) / after(of: [UIView]) - 오른쪽 배치
- left(of: UIView) / left(of: [UIView]) - 왼쪽 배치
- right(of: UIView) / right(of: [UIView]) - 오른쪽 배치
간단히 사용해 보면
      <swift>


      viewA.pin
    .top(view.pin.safeArea)
    .left()
    .size(200)

viewB.pin
    .top(view.pin.safeArea)
    .right(of: viewA)
    .size(100)

viewC.pin
    .below(of: viewA)
    .size(100)
참고로 배치만 도와주는 거라서, 따로 제약조건을 주지 않으면 x 또는 y축에서 0을 기준으로 배치가 됩니다.
(viewB는 ViewA의 오른쪽에 배치되고 y축으로는 0의 값을 갖게 된다.)

그래서 위의 메서드에서 추가로 (of:, aligned:) 파라미터도 추가해 줄 수 있는데, 이걸 사용해 선택한 뷰를 기준으로 정렬을 도와주는 메서드도 존재합니다.
      <swift>


      viewA.pin
    .top(view.pin.safeArea)
    .left()
    .size(200)

viewB.pin
    .right(of: viewA, aligned: .center)
    .size(100)

viewC.pin
    .below(of: viewA, aligned: .right)
    .size(100)

그리고 이렇게 margin도 줄 수 있습니다.
      <swift>


      viewA.pin
    .top(view.pin.safeArea)
    .left()
    .size(200)

viewB.pin
    .right(of: viewA, aligned: .center)
    .marginLeft(10)  // == marginStart, marginHorizontal
    .size(100)

viewC.pin
    .below(of: viewA, aligned: .right)
    .marginTop(10)  // == marginVertical
    .size(100)

일단 여기까지 후기로는
메서드 이름을 자세하게 직관적으로 만들어 놓은 건 좋은데, 사용해 보니까 거의 같은 기능인데 무슨 놈의 메서드가 이리 많은지, 참... 저는 오히려 시간도 걸리고 더 헷갈리네요.
다시 돌아와 뷰와 뷰 사이에 배치하는 방법을 알아봅시다.
일단 처음에 사용한 메서드를 통해서 만들어 줄 수 있습니다.
      <swift>


      viewA.pin
    .top(view.pin.safeArea)
    .left()
    .size(100)

viewB.pin
    .top(view.pin.safeArea)
    .right()
    .size(100)

viewC.pin
    .right(of: viewA, aligned: .center)
    .left(of: viewB)
    .height(50)  // 제약조건 완성을 위해 높이를 추가
      <swift>


      viewA.pin
    .top(view.pin.safeArea)
    .left()
    .size(200)

viewB.pin
    .bottom(view.pin.safeArea)
    .left()
    .size(200)

viewC.pin
    .below(of: viewA, aligned: .center)  // 아래를 기준
    .above(of: viewB)                    // 위를 기준
    .width(100)                          // 제약조건 완성을 위해 너비를 추가

이것도 역시나 메서드가 있네요...
- horizontallyBetween(:UIView, and: UIView, aligned: VerticalAlign)
- verticallyBetween(:UIView, and: UIView, aligned: HorizontalAlign)
확실히 가독성이 좋아지긴 했는데, 굳이? ㅎㅎ 아무튼 위에 코드랑 비교해 보시죠.
      <swift>


      viewA.pin
    .top(view.pin.safeArea)
    .left()
    .size(100)

viewB.pin
    .top(view.pin.safeArea)
    .right()
    .size(100)

viewC.pin
    .horizontallyBetween(viewA, and: viewB, aligned: .center)
    .height(50)
      <swift>


      viewA.pin
    .top(view.pin.safeArea)
    .left()
    .size(200)

viewB.pin
    .bottom(view.pin.safeArea)
    .left()
    .size(200)

viewC.pin
    .verticallyBetween(viewA, and: viewB, aligned: .center)
    .width(100)

Edges / Anchors (다른 뷰에서 제약조건 잡기)
다른 뷰에 대해서 모서리 또는 꼭짓점을 참조하여 레이아웃을 잡는 방법입니다.

기본적인 레이아웃 개념이 있다면, 위의 그림과 같이 생각해 보면 금방 사용할 수 있기 때문에 설명은 생략하겠습니다.
그냥 간단한 예제 코드를 참고해 주세요.
      <swift>


      viewA.pin
    .top(view.pin.safeArea)
    .left()
    .size(200)

viewB.pin
    // viewB의 top 모서리를 viewA의 bottom에 붙인다.
    .top(to: viewA.edge.bottom)
    .size(200)

viewC.pin
    // viewC의 topLeft를 viewB의 bottomRight에 붙인다
    .topLeft(to: viewB.anchor.bottomRight)
    .size(100)

      <swift>


      viewA.pin
    .top(view.pin.safeArea)
    .left()
    .size(200)

viewB.pin
    // viewB의 top 모서리를 viewA의 bottom에 붙인다.
    .top(to: viewA.edge.bottom)
    .size(200)

viewC.pin
    // viewC의 수직, 수평선을 viewB의 수직, 수평선에 붙인다.
    .hCenter(to: viewB.edge.hCenter)
    .vCenter(to: viewB.edge.vCenter)
    .size(100)

Width, Height
이것도 간단해서 예제만 보고 패스!
      <swift>


      view.pin.width(100)
view.pin.width(50%)
view.pin.width(of: view1)

view.pin.height(200)
view.pin.height(100%).maxHeight(240)

view.pin.size(of: view1)
view.pin.size(50%)
view.pin.size(250)
minWidth, maxWidth, minHeight, maxHeight
최소, 최대 너비 및 높이를 정해주는 메서드입니다.
      <swift>


      view.pin.left(10).right(10).maxWidth(200)
view.pin.width(100%).maxWidth(250)

view.pin.top().bottom().maxHeight(100)
view.pin.top().height(50%).maxHeight(200)

viewA.pin.top(20).hCenter().width(100%).maxWidth(200)
Adjusting size
콘텐츠의 크기에 따라서 맞추는 방법입니다. 보통 버튼, 레이블 등과 같이 고유 크기를 갖고 있는 뷰에서 사용하면 좋다고 하네요.
      <swift>


      // 뷰의 크기를 조정하고 중앙에 배치합니다.
view.pin.center().sizeToFit()

// 너비는 항상 고정된 속성 width(100)입니다.
view.pin.width(100).sizeToFit(.width)

// 뷰의 현재 너비에 따라 뷰의 크기를 조정합니다.
// 높이는 지정된 `maxHeight`보다 클 수 없습니다.
view.pin.sizeToFit(.width).maxHeight(100)

// 슈퍼뷰 높이의 100%를 기준으로 뷰 크기를 조정합니다.
// 높이는 항상 고정된 속성 `height(100%)`와 일치합니다.
view.pin.height(100%).sizeToFit(.height)

// 뷰의 현재 높이에 따라 뷰의 크기를 조정합니다.
// 너비는 항상 뷰의 원래 높이와 일치합니다.
view.pin.sizeToFit(.height)

// `.widthFlexible`이 지정되었으므로 결과가
// 너비는 라벨의 sizeThatFits()에 따라 100픽셀보다 작거나 커집니다.
label.pin.width(100).sizeToFit(.widthFlexible)
4. ScrollView를 적용시켜 보자!
기본적으로 ScrollView는 보이는 영역(ContentView 영역)의 제약조건을 세세하게 잡아줘야 합니다. 그래서 AutoLayout, SnapKit 등으로 구현할 때, 제약 조건을 한 번더 생각해야하는 번거러움이 있었죠. (예를들어, 컨텐츠 뷰의 하단부분은 스크롤 뷰 하단에 꼭 고정시켜줘야한다. 이런것들...)
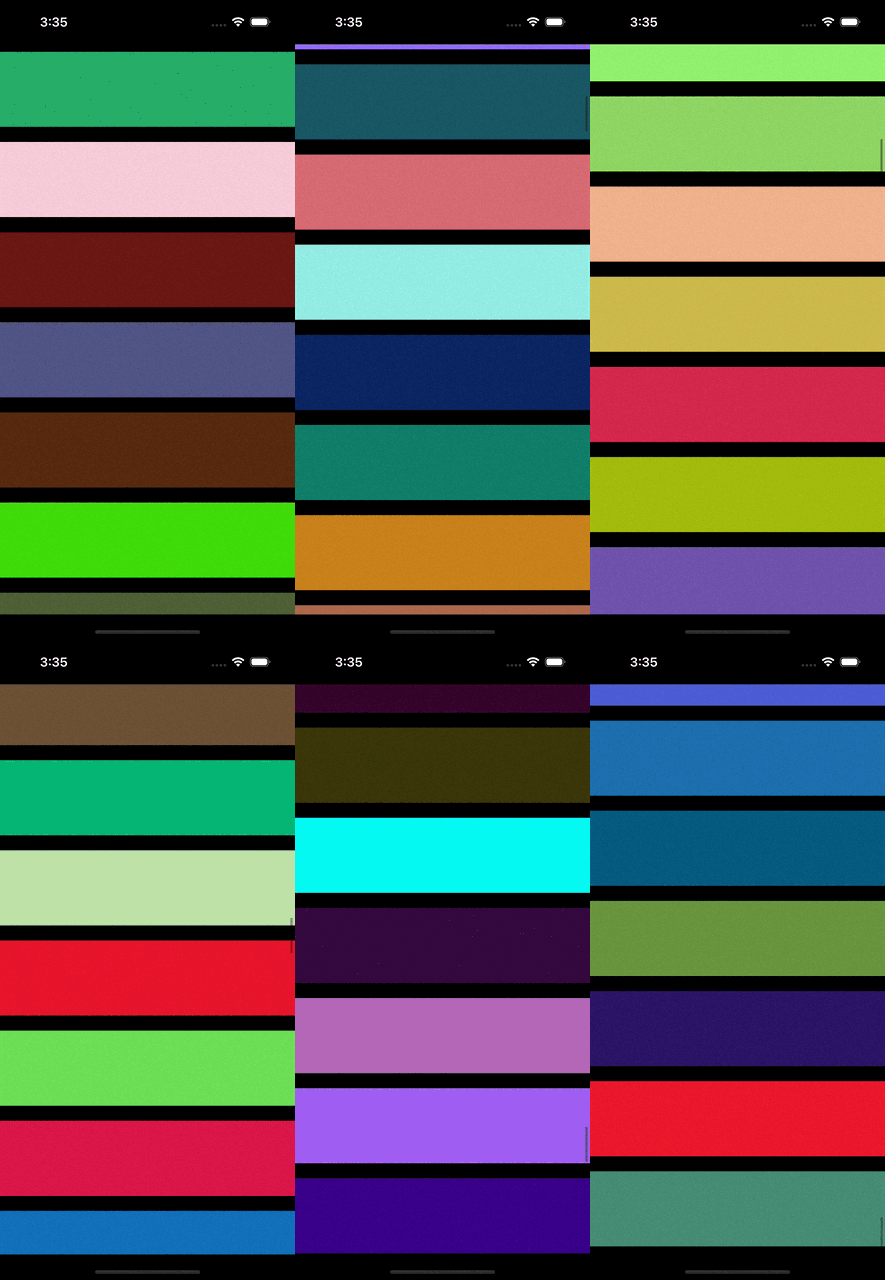
그런데 PinLayout + FlexLayout에서는 생각보다 적용이 간단하더라고요.
일단 여기 참고한 링크 를 남기고 시작해보겠습니다.
      <swift>


      import FlexLayout
import PinLayout

class ViewController: UIViewController {

    let container = UIView()  // 스크롤 뷰를 관리하기 위해 만들어준 컨테이너 뷰
    let scrollView = UIScrollView()
    let contentView = UIView()  // 스크롤 뷰 내부의 콘텐츠 영역

    override func viewDidLoad() {
        super.viewDidLoad()

        view.addSubview(container)
        container.addSubview(scrollView)
        scrollView.addSubview(contentView)

        let boxes = (0...100).map { _ in
            let view = UIView()
            view.backgroundColor = UIColor.random()
            return view
        }

        // 컨텐츠 뷰 내부에 컬러풀하게 뷰를 여러개 만들어 줬습니다.
        contentView.flex.define { flex in
            boxes.forEach { box in
                flex.addItem(box)
                    .height(100)
                    .marginVertical(10)
            }
        }
    }

    override func viewDidLayoutSubviews() {
        super.viewDidLayoutSubviews()

        container.pin.all(view.pin.safeArea)

        scrollView.pin.all()

        contentView.pin.all()

        // 👉 중요
        // 간단히 말해 스크롤 뷰는 무한한 뷰의 크기를 갖고 있으므로, 스크롤하는 방향을 제외하곤 나머진 고정시켜줘야 합니다.
        // 여기선 세로 방향으로 스크롤되기 때문에, 컨턴츠 뷰 레이아웃을 adjustHeight로 설정해줍니다. 너비는 고정 높이가 자동으로 조절됨.
        // 만약 가로(row)방향 이라면, adjustWidth로 설정해줘야 겠죠?!
        contentView.flex.layout(mode: .adjustHeight)

        // 위와 비슷한 이유료 콘텐츠의 크기를 알아야 스크롤이 가능합니다.
        scrollView.contentSize = contentView.frame.size
    }
}

SnapKit으로 만든 코드와 비교해 봅시다.
      <swift>


      import SnapKit

class ViewController: UIViewController {

    let container = UIView()
    let scrollView = UIScrollView()
    let contentView = UIView()

    override func viewDidLoad() {
        super.viewDidLoad()

        view.addSubview(container)
        container.snp.makeConstraints {
            $0.edges.equalToSuperview()
        }

        container.addSubview(scrollView)
        scrollView.snp.makeConstraints {
            $0.edges.equalToSuperview()
        }

        scrollView.addSubview(contentView)

        var previousBox: UIView?

        for _ in 1...100 {
            let box = UIView()
            box.backgroundColor = UIColor.random()
            contentView.addSubview(box)

            box.snp.makeConstraints {
                $0.height.equalTo(100)
                $0.width.equalToSuperview()

                if let previousBox = previousBox {
                    $0.top.equalTo(previousBox.snp.bottom).offset(20)
                } else {
                    $0.top.equalToSuperview()
                }
            }
            previousBox = box
        }

        // contentView의 하단까지의 크기를 직접 구현해줘야 한다
        contentView.snp.makeConstraints {
            $0.edges.equalToSuperview()
            $0.width.equalToSuperview()  // 또는 $0.leading.trailing.equalTo(view)
            $0.bottom.equalTo(previousBox!.snp.bottom)
        }
    }
}
나름 각자의 매력이 있긴한데, 확실히 FlexLayout + PinLayout이 가독성이 좋아보이네요.
5. 마무리
모든 걸 써보고 싶었지만 메서드들이 너무 많네요...
일단 많이 쓰일 것 같은거 위주로 사용해보고 정리를 해봤는데, 필요하면 공식문서 를 참조해야 겠습니다.
이상 PinLayout에 대해 마치겠습니다.
'Xcode > Library' 카테고리의 다른 글
| [iOS/Swift] 2. FlexLayout 모든 메서드들을 알아보자! (0) | 2024.01.16 |
|---|---|
| [iOS/Swift] 1. FlexLayout, PinLayout을 사용해 보자! (0) | 2024.01.15 |
| [iOS/Swift] CocoaPod 사용법 (0) | 2022.12.21 |
| [iOS/Swift] FireBase 사용법 (0) | 2022.12.20 |
| [iOS/Swift] Realm 사용법 (0) | 2022.12.20 |

